
Good morning! Today’s tutorial is all about using glimmer mist to colour lace. Here in Singapore, coloured lace is not easy to find, and usually quite expensive. Often, colours are limited. Plus, who has the time or inclination to run out to the store when you’re in the middle of a layout? White or off-white lace, in contrast, can be bought in 25 yard rolls from some of our textile shops, and this is what I use regularly in my layouts.
This tip I’m sharing today will help you use your scrap supplies to effortlessly colour your lace the exact shade you need for your layout. I’m going to use a layout of mine to illustrate. The regular readers may recognise this layout as one that was posted some weeks back. When I first started putting it together, I realized that the white lace just simply did not go with the coloured patterned paper I had chosen.

The lace needed to be a stronger colour to stand out. So I rummaged through my stash of glimmer mist, and found a colour that would achieve the effect I had in mind.

Next, lay the strip of lace on some old newspaper. One sheet of newspaper will not be enough. Use at least several layers as the glimmer mist is going to soak through the first few layers.

Start spraying the glimmer mist on the lace.

Make sure every part of the lace is covered.


Some types of lace are more resistant to water (for some reason) so what I normally do is turn the lace over and press it down into the excess glimmer mist that has been sprayed on the newspaper. Dig in and get your hands dirty (glimmer mist dye washes off after one shampoo/bath) and pat along the entire length of the lace. The more dye soaks in, the more saturated and ‘glimmery’ your finished strip of lace is going to be.

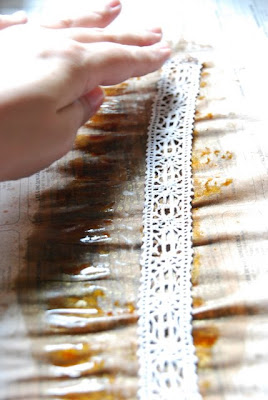
When you’re done, turn it back over and leave it on the newspaper to dry.

You may wish to put it on a clean part of the newspaper to aid drying. Alternatively, you can use a heat gun – that is what I normally do as I really want to finish the layout once I start it; in Singapore’s humid climate it will take at least 24 hours to dry fully if left to itself. Using the heat gun, though, tends to shrink the lace a little, so you may then wish to start off with a strip slightly longer that what you actually need, you can always trim off the excess when putting together the layout.
And there you have it, a nice deep brown and ‘glimmery’ strip of lace which you can use on your layout in place of what would have been a while and insipid strip.

This little trick can save you some moolah as you’re basically using items in your stash and you can even bulk buy white lace to save further.
And if you don’t have enough glimmer mist colours, not to worry. Just use the chalk or pigment inks that you use for stamping. The same rules apply, place the lace on several layers of newspaper, and turn the ink pad over and pounce or tap it along the entire length, paying attention to any uneven patches. If the lace appears to be resistant to the colour, just tap harder. As is the case with using glimmer mist, you will end up with a very damp strip which you then dry using either of the 2 methods above. And voila! Lace of the exact shade and colour you need. And it doesn’t end there. You can use several colours of ink to get a variegated effect, or even adjust the saturation along the strip to achieve colour gradation. The possibilities are endless!
So get cracking with your glimmer mist and inks and post the result in our gallery! Thanks for joining us today, and we look forward to seeing you back this Friday when we post our next challenge!


 Some types of lace are more resistant to water (for some reason) so what I normally do is turn the lace over and press it down into the excess glimmer mist that has been sprayed on the newspaper. Dig in and get your hands dirty (glimmer mist dye washes off after one shampoo/bath) and pat along the entire length of the lace. The more dye soaks in, the more saturated and ‘glimmery’ your finished strip of lace is going to be.


 This little trick can save you some moolah as you’re basically using items in your stash and you can even bulk buy white lace to save further.
 Our Guest Designer this month is Sasha. Check out her amazing art here. If you'd like to play along with us all the info is here.






 Please don't steal our work. If you'd like to use it, just ask us. We're pretty nice and we'll probably say yes. It's super hard work making all this stuff and we'd like it if you asked us before using it.


 Gudrun


 Vanessa
 Eva
Eva


