
 DIFFERENT WAYS TO MAKE A MINI ALBUM
Hi! Today I’m going to show you different ways to make a Mini Album. When I started scrapbooking I made lots of minis, I love them! They are very cute, you can put lots of photos, tell a story, scrap a whole trip, etc… and they are always the perfect gift!
I’m going to show 4 ways you can put together a mini:
- Basic
- Accordion style
- Magazine style
- “Book style”
BASIC MINI
The basic one, and the one I use the most on my albums is to just make two or three holes and then use a binding ring. If you don’t have these mini rings you can use key chain rings like the ones I used here, they are made from plastic and I found them in a kids game!
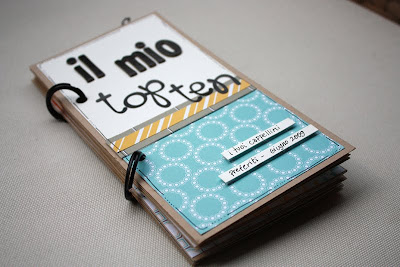
Otherwise you can just put some ribbon or string like this one

If you use ribbon or string please make sure not to tie the knot very hard or you will not be able to flip the pages.
ACCORDION STYLE MINI
For the accordion style mini, you will need to cut your papers of the height of the page you want, but you will have to double the length. Every paper will contain 2 pages of your mini so you will have to cut half of the papers. For example: If you want a mini with 8 - 4X4 pages. You will have to cut 4 - 4x8 papers . Use one side paper for this because the back of the paper will not show.

To make the pages of your album crease the pages at half (1). Cover the right side of every page with double side tape (2) and adhere the pages as seen in picture number 3. Complete the accordion (4).

For the covers, cover a piece of chipboard 1/2 inch larger and wider than the pages of your mini with a coordinating paper (1 and 3). *The paper will have to be 2 inches wider than the chipboard also*
Adhere the covers to your pages (2) making sure to insert a ribbon in the back or in the front cover to close it (5).
MAGAZINE STYLE MINI
For the “Magazine style” mini cut your papers of the height of the page you want, but double the length. You will need double side papers for this as the back will show.

Make a crease in the middle of your pages (1). Decide where you want to make the holes (2). Use your hole punch (3) and make the closure with some string or some ribbon. If necessary, use a big needle to pass the ribbon through and decorate the ends with buttons, beads or simply a knot. (4 and 5)
Note: If you have lots of pages you will have to trim the excess of the inner pages. To do this simply use your paper trimmer or a cutting knife. (6)

BOOK STYLE MINI
For the Book style mini you will need to cut your pages following the same steps than the accordion style. You will also have to cut a piece of paper ½ inch wider than the length of your pages for the cover. (2)

Cover the pages of your mini with double side tape. I covered the whole page but you can cover just half … my mistake! (3)
Close all your pages leaving the design in the inside. Adhere the pages. (4).

All the creases will remain in one side of the mini (6).
Fold you mini album (7) and cover with the last piece of paper (8). Do this while your book is closed, otherwise you will not be able to close it!
To cover the creases, cut a piece of coordinating paper and adhere it to the side. Before adhere it insert a ribbon to close the mini (9).
And here are my three minis all together! Now I just have to fill them up!

Wow! How many ways to make minis! I hope you like them. If you use one of these techniques or have a doubt please leave a comment!
Bye! Eva


 Our Guest Designer this month is Sasha. Check out her amazing art here. If you'd like to play along with us all the info is here.
 DIFFERENT WAYS TO MAKE A MINI ALBUM






 Please don't steal our work. If you'd like to use it, just ask us. We're pretty nice and we'll probably say yes. It's super hard work making all this stuff and we'd like it if you asked us before using it.


 Gudrun


 Vanessa
 Eva
Eva


